Implementation of PHMSA mega rule elevates NDT’s importance
Jeffrey Kornuta
Exponent Inc.
Houston, Tex.
John Corbin
Exponent Inc.
Oakland, Calif.
Peter Veloo
Pacific Gas and Electric Co.
Walnut Creek, Calif.
In October 2019, the US Department of Transportation’s Pipeline and Hazardous Materials Safety Administration (PHMSA) introduced new regulations to 49 CFR Part 192 pertaining to natural gas pipelines, colloquially referred to as the “2019 Gas Transmission Rule” or the “Gas Mega Rule” due to the large undertaking these new regulations lay out. One new section of the rule, §192.607, requires verification of material properties of the pipe and fittings when traceable, verifiable, and complete (TVC) records do not exist.
Operators may not have TVC records of material properties for certain pipeline segments, especially those of an older vintage or that were part of a more recent acquisition. In instances requiring materials verification and reconfirmation of maximum allowable operating pressure, operators had to have documented their procedures for complying with the new regulations by July 2021.
Anticipating these new rules, Pacific Gas and Electric Co. (PG&E) and Exponent have collaborated since 2014 to develop and implement a materials verification program addressing pipeline segments lacking TVC materials records, gathering more than 25,000 materials verification data points. This article addresses implementation considerations and lessons learned during PG&E’s material verification program.
Nondestructive verification rules
The new rules in §192.607 state that if an operator does not have TVC records for pipeline characteristics and attributes required by §192.607(b), such as seam type or grade, the operator must develop and implement procedures to verify the material properties through either destructive or nondestructive means.1
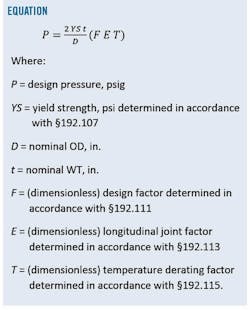
The material properties and attributes of a pipeline determine its allowable capacity, as described by the design pressure formula (Barlow’s formula) outlined in §192.105(a) (see equation).
Confirming these properties for a given pipeline segment is critical to confirming its maximum allowable operating pressure (MAOP) and conducting ongoing integrity management. There is also an opportunity cost for not confirming these material properties if a lower strength value must be assumed. As described in §192.107(b)(2), pipe with unknown material strength properties may have to assume a lower strength value that ultimately reduces MAOP.
The explicit code allowance of nondestructive testing (NDT) methods for confirming material properties is new to the gas pipeline industry. Unlike destructive laboratory tests that have been widely used for decades and have established detailed codes and standards governing implementation and repeatability, many NDT technologies are relatively new and do not typically have such prescriptive standards. But these technologies have a big advantage. Being nondestructive allows performance of material verification assessments in the field non-disruptively without needing to physically remove the pipeline segment, interrupt the flow of gas, or blow down the line in many cases.
In this context, §192.607(d) specifies additional requirements if using NDT methods for material verification. For example, the rules state that NDT methods used must be “validated by a subject matter expert based on comparison with destructive [laboratory] test results on material of comparable grade [strength and chemical composition] and vintage”2 and must “conservatively account for measurement accuracy and uncertainty using reliable engineering tests and analyses.”3 Therefore, using these technologies for material verification requires additional validation beyond what would be needed if an operator was using traditional lab-based destructive testing methods.
Instrumented indentation testing
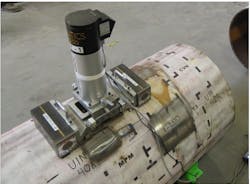
Instrumented indentation testing (IIT) nondestructively estimates mechanical properties of a material (i.e., yield strength (YS) and ultimate tensile strength (UTS)). IIT accomplishes this by measuring a material’s response to a series of small-scale surface indentations and then relating this indentation response to its stress-strain properties. Fig. 1 shows an IIT tool mounted to a 24-in. OD natural gas pipe.
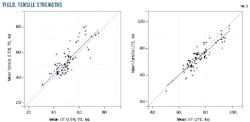
NDT methods used for materials verification must satisfy several requirements pertaining to validation, measurement accuracy, and uncertainty under §192.607. For IIT specifically, PG&E has performed validation testing on more than 90 separate pipe samples conducting in excess of 430 tensile tests and 2,700 IIT measurements. These pipe samples spanned a range of diameters from 4.5 to 36 in., API pipe grades from less than Grade B to X70, and vintages from the 1930s to the 2010s. Fig. 2 shows a set of plots comparing the performance of mean IIT measurements with mean tensile test measurements (the standard destructive method for determining YS and UTS) for these data on a per-pipe basis.
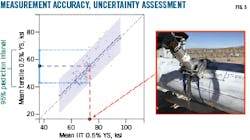
Fig. 3 shows a graphical example of how measurements taken in the field can be interpreted using previously collected validation data. First, the validation data can be analyzed using a linear regression to find the best-fit linear model relating the IIT to tensile test measurement. The corresponding prediction interval may then be calculated to statistically quantify the uncertainty of any additional measurements taken. Hence, by compiling the in-situ IIT measurements for a given pipe segment in the field, one can use this validation analysis to understand the expected accuracy and uncertainty of this new IIT data with respect to tensile testing.
Implementation considerations
The first step for an operator is to complete a review of its records. The level of effort required can vary greatly based on the operator’s historical recordkeeping practices. In PG&E’s case, detailed review was completed on about 6,500 miles of pipe. Features with non-TVC records of either material property information or pressure test records were then flagged. Whatever the historical practices were, it is important to update and enhance the process to ensure records can be maintained for the life of the pipeline as required by 192.607(b) and that future records assessment efforts are simpler and more efficient.
The accompanying table depicts required attributes OD, WT, seam type, and grade. Operators may choose to list items like specified minimum yield strength (SMYS), pressure ratings, location data, length, qualifying records, manufacturing process, pipe manufacturing dates, construction dates, population, and other characteristics for improved visibility and ease of access.
Thorough review enables the operator to identify gaps in TVC records, provides a baseline for required future work, and informs prioritization of upcoming work. Understanding the records also allows the operator to quantify operational risks and opportunity costs referenced.
Operators can resolve these records opportunistically and systematically. Aboveground line pipe and components can be assessed systematically. According to §192.607(c) buried line pipe and components should be verified opportunistically during:
- Anomaly direct examinations.
- In situ evaluations.
- Repairs.
- Remediations.
- Maintenance.
- Excavations associated with replacements or relocations of pipeline segments removed from service.
To further increase potential bundling efficiencies afforded by these opportunities, the operator should plan and determine what type of material property evaluation makes the most sense with respect to safety and operation. In general, considerations should be made comparing the material property verification method with the integrity management scope required. One important factor in this comparison is the requirement for the interruption of the gas flow. For example, when completing anomaly direct examination, an NDT method for material property verification allows the operator to complete this work without taking a clearance or making a cutout. However, if a repair requiring a cutout and a clearance is required, standard laboratory testing to determine material properties for that segment might be preferred.
Another factor for consideration is population analysis, which is detailed in §192.607(e) and can improve the efficiency and effectiveness of a materials verification program. A few of the attributes already discussed, specifically items providing vintage, WT, and grade, are required to create the populations. In large populations, this limits the required sampling at the opportunistic locations to one excavation per mile rounded up to the nearest whole number of miles or 150 excavations if the population covers more than 150 miles.4
Lessons learned
PG&E and Exponent have been working together to develop a material property verification program for almost 7 years. During this effort, there have been many learning opportunities, a few of which follow.
- Plan for data. The amount of destructive and NDT data needed to support validation requirements and field-testing results is massive. Operators should implement a comprehensive data management plan before gathering it; using spreadsheets will eventually become a bottleneck. It is also important to ensure proper process planning by creating management tools like process maps and procedures to capture, perform quality control, store, and query the data.
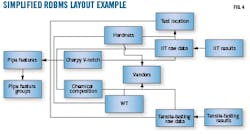
A relational database management system (RDBMS) will be needed to tackle an effort of this magnitude. Fig. 4 shows an example simplified RDBMS layout for organizing and storing an operator’s materials verification data. In addition to being able to handle much more data than a series of spreadsheets, different types of data can be related together for logical organization. Specific queries such as “list the pipe features at this regulator station, each with average 12-point wall thickness, average yield strength measured by IIT, and average manganese (Mn) weight percentage measured by X-Ray Fluorescence (XRF)” become trivial with an RDBMS in place.
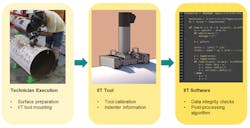
- Ensure NDT quality. Operators should work closely with vendors, tool manufacturers, and subject matter experts to ensure high quality data capture. Reliable NDT materials verification data require attention to three major areas: technician execution, NDT hardware, and post-processing software. Technician qualifications (operator qualifications or endorsements), detailed work standards and procedures, and robust training programs ensure field technicians are gathering data in the best way possible. Attention to these areas will also minimize data uncertainty driven by tool operation. Good hardware, properly calibrated and field verified, is also a requirement. Lastly, but equally important, is the software that analyzes the raw data captured by the tool’s hardware and the technician’s skill. Unlike standard destructive lab testing, a vendor-developed post-processing algorithm is often required for NDT methods to properly interpret results.
Surface preparation and IIT tool mounting are critical tasks performed by the technician that can affect data quality (Fig. 5). The tool should be calibrated in accordance with the manufacturer’s recommendations, checked routinely to verify functionality, and have its indenter characteristics confirmed. Operators also should study the IIT analysis software to better understand what assumptions are being made, what input parameters introduce uncertainty, and what the algorithm’s limitations are.
- Give yourself a buffer. Even with excellent planning and management of training, hardware, and software, gathering perfect data is difficult. Environmental conditions can occasionally cause unpreventable errors. Testing plans should be created that allow for error checking and auditing of NDT results. For example, 192.607(c)(1) requires 5 test readings at each pipe cylinder location in at least two circumferential quadrants. PG&E’s standard testing plan requires three circumferential quadrants and 10 readings at each prepped location for a total of 30 readings. It is much easier to acquire more measurements on site than to realize more data is needed after the excavation has been backfilled.
Adoption timeline
Although §192.607 does not provide an explicit deadline for verifying pipeline material properties of pipelines without TVC records, it does state that operators must develop and implement procedures for conducting tests (destructive or nondestructive), examinations, and assessments for both aboveground and buried line pipe and components to verify material properties.1
Material verification under §192.607 may be performed as part of MAOP reconfirmation. Specifically, for pipeline segments described in §192.624(a) as needing MAOP reconfirmation, §192.624(b) stated that pipeline operators “…must develop and document procedures for completing all actions required by this section by July 1, 2021.” This section also said that these procedures must include a process for material verification in accordance with §192.607, if applicable.5
Regarding implementation, §192.624 also specifies when the actions required by this section must be completed. Operators must complete all actions required by this section on at least 50% of pipeline mileage by July 3, 2028,6 and must complete all actions required by this section on 100% of pipeline mileage by July 2, 2035, or as soon as practicable, but not to exceed four years after the pipeline segment first meets a condition of §192.624(a) (e.g., due to a location becoming a high consequence area), whichever is later.7
References
- Code of Federal Regulations Title 49 Part 192 “Transportation of Natural and Other Gas by Pipeline: Minimum Federal Safety Standards,” Section 607(c), Pipeline and Hazardous Materials Safety Administration, Department of Transportation (49 CFR § 192.607(c)).
- 49 CFR § 192.607(d)(1).
- 49 CFR § 192.607(d)(2).
- 49 CFR § 192.607(e)(2)
- 49 CFR § 192.624(b)
- 49 CFR § 192.624(b)(1)
- 49 CFR § 192.624(b)(2)
The authors
Jeffrey Kornuta ([email protected]) is a managing engineer at Exponent Inc., Houston. He has also served as a National Science Foundation Graduate Research Fellow at the Georgia Institute of Technology. He holds a PhD in mechanical engineering (2014) from the Georgia Institute of Technology, and an MS (2009) and BS (2008) in mechanical engineering from Louisiana State University. He is a registered professional engineer in Texas and Louisiana, a member of American Society of Mechanical Engineers, and a senior member of American Institute of Aeronautics and Astronautics.
John Corbin ([email protected]) is a senior manager at Exponent Inc., Oakland, Calif. He has also served as a senior project manager at Clark Construction. He holds a BS in civil engineering (2008) from the University of Virginia.
Peter Veloo ([email protected]) is a principal integrity management engineer at Pacific Gas and Electric Co., Walnut Creek, Calif. He has also served as principal engineer at Exponent Inc. He holds a PhD (2011) from the University of Southern California, an MS from the University of Maryland, and a BE from the University of Canterbury. He is a registered professional engineer in California and a member of National Association of Corrosion Engineers, American Society for Nondestructive Testing, and Association for Iron & Steel Technology.
