Indentation technique provides pipeline integrity monitoring
With the international transportation networks of oil and gas pipelines aging, automated ball indentation (ABI) testing provides a means of monitoring their structural integrity, particularly important in high-consequence areas.
Pipeline rehabilitation concerns are coupled with the demands of meeting current and future energy demands by safely increasing transmission throughput. This article describes applications of a stress-strain microprobe (SSM) system using an in situ nondestructive ABI test technique to measure stress-strain curves and fracture toughness properties of in-service steel pipelines.
The SSM system provides key mechanical properties (tensile and fracture toughness) from each single ABI test in a nondestructive and localized fashion without any interruption to the pipeline transmission service.
Integration of SSM measurements with conventional, non-destructive inspection results (crack-flaw size and corrosion pitting profile measurements) allows calculating the maximum safe operating pressure and determination of replacement or repair of older pipelines. The quality of seam welds and girth welds in repair jobs or in new pipeline construction, particularly for high strength grades such as X-80 to X-120, also can be quantified thoroughly from their ABI-measured fracture-toughness values and tensile properties. True verification of weld overmatch, mandated for the strain-based design of arctic or earthquake-prone pipeline applications, requires this quantification.
ABI-measured fracture toughness values do not depend on material-thickness for pipelines and pressure vessels with thickness greater than 5 mm. Using the ABI-determined reference temperature, set during field ABI tests at ambient temperature, and the fracture toughness master curve concept allows calculation of the critical flaw size for any operating temperature.
SSM integration
The in situ SSM system of Advanced Technology Corp., Oak Ridge, Tenn., allows nondestructive field measurements of key local mechanical properties of pipeline base materials and welds.1-5 These properties include the yield strength (which determines the grade of pipeline steel material and maximum safe operating pressure), true-stress vs. true-plastic-strain curve, strain-hardening exponent (uniform ductility), strength coefficient, ultimate tensile strength, and initiation fracture toughness (which determines the critical size of service-induced sharp cracks).
The US Office of Pipeline Safety of the Department of Transportation has reviewed SSM technology and recommended its use by the pipeline industry.
The SSM system uses an ABI technique that is nondestructive, fast (less than 2 min/test), and accurate. The ABI test requires a reasonable, localized polishing of the test area for indentation testing. The spherical indentations it produces on the pipeline surface are shallow, smooth depressions (i.e., no sharp edges and, hence, no stress-concentration sites). Further, the ABI test leaves a compressive surface residual stress that retards crack initiation, similar to the shot-peening process used routinely in the aerospace industry. Therefore, the ABI test, although a true and robust mechanical test, is considered nondestructive.
Laboratories have conducted thousands of ABI tests on ferritic steel samples, including grades B to X-100, at various test temperatures. Numerous ambient-temperature ABI tests have also been conducted in the field in the US, Europe, Africa, and Asia.
The integration of key SSM-measured mechanical properties with crack sizes or the maximum depth and spacing of corrosion pits, measured with ultrasonic and other techniques, allows a deterministic structural integrity assessment (DSIA), the calculation of the maximum safe transmission pressure for these pipelines, and will also allow safe up-rating.
ATC’s report to the US DOT shows a large set of pipeline test results (http://www.atc-ssm.com/PDF/dotpipe-fr.pdf). ASTM International commissioned a task group to draft a new standard, “Standard Test Methods for Automated Ball Indentation Testing to Determine Stress-Strain Curves and Ductility of Metallic Samples and Structures at Various Test Temperatures.” ATC’s website contains further reference materials, including numerous downloadable publications (http://www.atc-ssm.com/library.html).
The nuclear, defense, transportation, and aerospace industries, among others, have used ABI technology for more than 15 years, although it has only recently been introduced to pipelines.
Background
Commercial use of the laboratory version of the SSM system has been taking place worldwide since 1991. A portable in situ SSM version was introduced in 1996, and a miniature SSM system introduced in 1999 provides even greater portability. Equipped with a small battery-pack and DC electric-magnet mounts, this system has proven a valuable test instrument for the pipeline industry.
The accuracy, reliability, and easy field applicability of the SSM system to test pipeline materials with unknown properties have been demonstrated on samples and pipe sections from several pipeline companies and on many in-field pipelines and their welds.
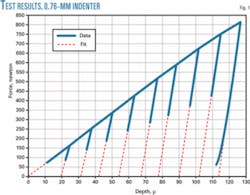
Progressive indentation with intermediate partial unloadings until the desired maximum depth (maximum strain) is reached provides the basis of the ABI test, with the indenter then fully unloaded (Fig. 1). A 16-bit data acquisition system collects the indentation load-depth data continuously during the test.
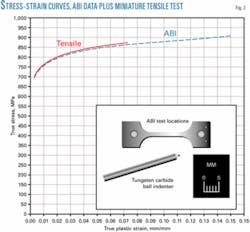
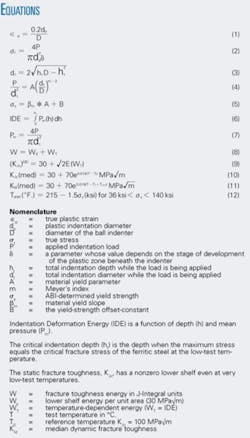
The nonlinear spherical geometry of the tungsten carbide indenter allows increasing strain as the indentation penetration depth is increased. Established elasticity and plasticity theories (Equations 1-5; see accompanying equation box) allow conversion of the incremental values of load (at the end of each progressive loading cycle) and plastic depth (associated with each partial unloading cycle and the upper part of the final full unloading data) to incremental values of true-stress and true-plastic-strain values (Fig. 2).1-3
A computer, data acquisition system, and a servo motor perform the fully automated ABI test, and a single test is completed in less than 2 min., depending on the desired strain rate. The ABI test applies to all materials, regardless of the amount of material pileup around the indentation. The pileup volume depends on the thermomechanical treatment or Lüders strain behavior of the test material.
Haggag’s earlier work used mechanical profilometry and optical interferometry to quantify the pileup or Lüders strain accurately to determine yield strength and stress-strain values from ball indentation.6
In 1989 Haggag invented the progressive ABI test with intermediate partial unloadings to make the test easier, automated, faster, more accurate, and applicable to in situ test applications. The ABI software performs linear regression on the load-depth data of each elastic-linear partial unloading and on only the upper part of the full unloading at the end of the test. The data are then extrapolated to the X-axis to determine the plastic depth associated with the maximum load of each cycle of the ABI test.
Use of full unloading will not determine the plastic depth because of the non-linearity of the last 20-30% of the full unloading data. Experimental nonlinearity results in lower plastic depth and consequently incorrect plastic-strain value.
The plastic indentation depth and its associated cycle maximum load, the indenter diameter, and the elastic moduli of the test material and the indenter calculate the plastic indentation diameter and consequently the true-plastic strain.1-3
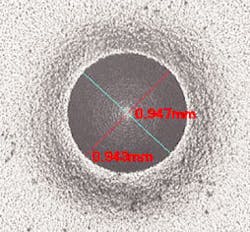
Fig. 3 shows a final indentation produced with a 1.57-mm diameter tungsten carbide indenter on a 4142 steel sample. Despite the pronounced pileup shown in Fig. 3, the average plastic indentation diameter of 945 µm (from optical measurements of 0.943 mm and 0.947 mm) lies within 1.1% of the calculated diameter of 935 µm with the partial unloading technique.
The precision statement of the draft ASTM Standard ABI Test Methods (Table 1), determined in a round-robin study involving six organizations, has further demonstrated the accuracy of the method.
The round-robin study used two aluminum alloys (6061 and 7075) and two steel alloys (1018 and 4142), with a wide range of flow properties.
Other ball indenters (e.g., 0.25-mm, 0.51-mm, and 0.76-mm diameters) can interrogate small volumes such as spot or laser-beam welds. The choice of indenter diameter, however, must consider the grain size of the test material in order to measure macroscopic tensile and fracture-toughness properties.
Table 2 provides summary results from five ABI field tests conducted on a 24-in. OD steel pipeline of unknown grade. The standard deviation of every ABI-measured property shows excellent field-test repeatability and good homogeneity in the pipeline steel.
The ABI-measured tensile results indicate that the pipeline steel meets Grade X-52.
Fracture toughness
Indentation with a ball indenter generates concentrated stress (and strain) fields near and ahead of where the indenter and the test surface meet, similar to concentrated stress fields ahead of a crack tip. The indentation stress fields, however, are mostly compressive.
The high value of the stress under the ball indenter represents plastic constraint when the rigid material surrounding the indentation volume does the constraining. At a certain critical ball-indentation depth, therefore, a high state of transverse and lateral stresses emerges, similar to those in front of a sharp notch in an elastic material.
Although these circumstances might allow conditions for crack initiation, the high degree of plastic constraint will prevent cracks from developing during ball indentation of ductile metallic materials. Ball indentation, therefore, can only determine initiation fracture toughness, not tearing modulus (Equations 6-12).
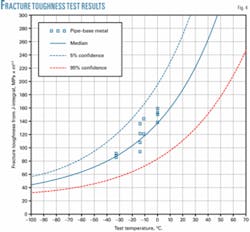
The integration of the indentation deformation energy (IDE) up to the critical depth calculates initiation fracture toughness. Critical depth occurs when the maximum pressure underneath the ball indenter equals the critical fracture stress of the steel material at the test temperature or reaches a critical strain value of 0.12. Fig. 4 shows an example of the ABI-measured fracture toughness results on a pipeline steel.
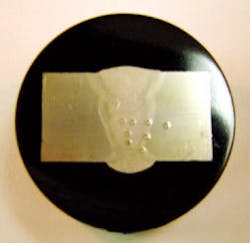
The ABI-measured fracture toughness capability does not depend on material-thickness, because different size indenters can be used for all pipelines and pressure vessels to achieve valid results. Its localized nature also allows testing of heat-affected zones (HAZ) that cannot be tested destructively due to their irregular shapes and small volumes (Fig. 5).
The determination of tensile and fracture toughness properties from in situ nondestructive ABI tests allows for deterministic structural integrity assessment or fitness-for-service evaluation based on robust fracture mechanics analysis. The SSM technology and its ABI test technique produce results superior to destructive tensile and fracture toughness tests, as well as hot-tapping and Charpy impact tests.
References
- Haggag, F.M., “Field Indentation Microprobe for Structural Integrity Evaluation,” US Patent No. 4,852,397, 1989.
- Haggag, F.M., “In Situ Measurements of Mechanical Properties Using Novel Automated Ball Indentation System,” ASTM STP 1204, pp. 2744, 1993.
- Haggag, F.M., et al., “Use of Portable/In Situ StressStrain Microprobe System to Measure StressStrain Behavior and Damage in Metallic Materials and Structures,” ASTM STP 1318, pp. 8598, 1997.
- Haggag, F.M., and Phillips, L.D., “Integrating Automated Ball Indentation with ASME B31G Code to Assess Remaining Integrity of Corroded Pipelines,” ASME Proceedings of the International Pipeline Conference, IPC04-0357, Calgary, Oct. 4-8, 2004.
- Haggag, F.M., and Phillips, L.D., “Innovative Nondestructive Method Determines Fracture Toughness of In-Service Pipelines,” ASME Proceedings of the International Pipeline Conference, IPC04-0345, Calgary, Oct. 4-8, 2004.
- Haggag, F.M., and Lucas, G.E., “Determination of Lüders Strains and Flow Properties in Steels from Hardness/Microhardness Tests,” Metallurgical Transactions A, Vol. 14A, pp. 1607-1613, 1983.
The author
Fahmy M. Haggag ([email protected]) is president and founder of Advanced Technology Corp., Oak Ridge, Tenn. He has more than 35 years of research and development experience in various aspects of structural-integrity assessment and fracture mechanics. Before founding ATC, he worked for Oak Ridge National Laboratory, Battelle Columbus Laboratories, and Idaho National Engineering Laboratory. He holds two MS degrees in nuclear and materials engineering from the University of California, Santa Barbara (1980) and the University of Alexandria, Egypt (1976). Haggag is a member of ASME, ASM, NACE, and ASTM.

