Changes proposed for determining line pipe wall thickness
Pipeline operating companies' safety records and published results of experimental and analytical studies indicate that the present traditional design formulation for determining required line pipe wall thickness is conservative. This has become an important issue with oil and gas transportation companies.
It is possible to modify this conservative bias that would allow the reduction of pipeline wall thickness without compromising the integrity of new pipelines.
The existing method of calculating the required wall thickness or allowable pressure as presented in ASME Code B31.8 is based upon the allowable hoop stress. Code B31.8, Paragraph 805.234, states that "the maximum allowable hoop stress is the maximum hoop stress permitted by this Code for the design of a piping system."
Equation 1 (Equations box) shows the B31.8 variables for determining wall or thickness design pressure and the corresponding equations for calculating hoop stress and allowable hoop stress.
Code B31.8 does not include any criteria or equations for modifying the wall thickness due to the combined effects of temperature rise and internal pressure for restrained onshore pipelines.
This proposal to modify B31.8 consists of three parts:
- Consideration of the minimum wall thickness (design factor).
- A precise equation for hoop stress determination.
- The consideration of wall thickness vs. temperature differential for a restrained pipeline.
The proposed method uses the basic principles and methodology of B31.8 and the concept of limit-state design.1
Minimum wall thickness
The allowable hoop stress according to B31.8 is a percentage of the specified minimum yield strength (SMYS) and is determined by and depends upon a design factor that is a very complicated parameter.
The design factor should consider failure statistics of pipelines, the probability of a specified property of the material, the cost of rehabilitation, public safety, and dimensional tolerances. Special studies and evaluations require changing these values for different conditions.
ASME Code B31.42 and B31.8, Paragraph 841.11 note that "In setting the values of the design factor, due consideration has been given and allowance has been made for the various underthickness tolerances provided for in the pipe specifications listed and approved for usage in this Code."
We will examine the question of minimum wall thickness and underthickness tolerance, which is part of the design factor.
According to API Specification 5L,3 for a pipe diameter of less than 20 in., the maximum negative tolerance is –12.5% of the specified nominal wall thickness; for Grade X-42 or higher welded pipe with a diameter of 20 in. and larger, the maximum negative tolerance is –8.0% of the specified nominal wall thickness.
Existing pipe manufacturing technology, however, is able to produce pipe with a guaranteed negative tolerance with an absolute value less than that specified by the code. In fact, guaranteed negative tolerances with an absolute value of less than 5% of the nominal wall thickness are often encountered.
If one takes into account the actual tolerance, which can now be requested in material specifications for the manufacture of pipe for a specific project, the allowable or required nominal wall thickness may be reduced.
Assume that the allowable pressure is proportional to the minimum wall thickness (nominal thickness less the underthickness tolerance), as in some codes outside the US.4 5 Then, if the absolute value of the guaranteed negative tolerance is less than that specified by the codes, the design factor can be increased and would be calculated by Equation 2.
Using the B31.8 criteria for pipe wall thickness calculations, Equation 3 calculates the applicable allowable hoop stress.
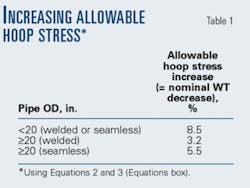
As an example, therefore, use of Equations 2 and 3 for pipe having a guaranteed negative tolerance of –5% permits the allowable hoop stress to be increased, and therefore the nominal wall thickness could be decreased (Table 1).
More accurate equation for hoop stress
Code B31.8 uses Barlow's formula for hoop stress determination. This formula is based upon several assumptions:
- The hoop stress across the pipe wall is constant.
- The section of pipe is a ring with a diameter equal to the nominal outside diameter.
- The distribution of radial stresses across the wall is neglected. The hoop force in a ring is defined from the static condition of equilibrium, and hoop stress is calculated for the nominal wall thickness.
Next, the more complicated analytical solution for linear elastic material considers the distribution of hoop and radial stresses across the wall and is known as the Lame Solution.6 It should be particularly emphasized that, according to the Lame Solution, the maximum hoop stress due to internal pressure occurs on the inner wall surface, but it is known that the bursting of a pipe due to internal pressure starts from an external wall surface.
The trend of the pipeline codes is to permit designs based upon limit-state criteria.1 One of the conservative methods for limit-state design is to apply traditional allowable stress criteria for calculated stresses while considering the actual, nonlinear behavior of the material.
The proposed wall-thickness design formulation considers the nonlinear property of pipe material, i.e., the elastic-plastic stress-strain diagram.7 This method allows a very simple determination not only of the stress but also of the corresponding strain and utilizes, if required, the allowable strain criterion.
The proposed formulation also considers the distribution of radial stress across the wall. Because Code B31.8 has no limitation on internal pressure, in some cases radial stress can be significant and its role in determining pipe-wall thickness cannot be neglected.
As is known from the Lame Solution, in the elastic range of stress the maximum hoop stress and combined stress due to internal pressure take place on the internal surface. With internal pressure increased above the value that produces combined stress on the inner surface of pipe equal to the proportional limit, the area of the wall nearest the inner surface is in a plastic condition.
The stress-strain diagram in elastic and plastic areas may be described in different ways. The stress-strain diagram has a limit of proportionality. After that limit point is reached, the slope of curve changes and can be described in different ways.8 The first area is designated the elastic area; the second is the plastic area.
The pipeline wall thickness required due to pressures uses an elastic, linear hardening stress-strain diagram (showing the relationship between combined stress and combined strain). This diagram is conservative in this case and results in a simplified analytical solution for design purposes.
It is assumed that the elastic area ranges from zero to the stress of proportionality limit and has a tangent equal to the modulus of elasticity. The limit of proportionality between stress and strain is about equal to 70-75% of the yield stress.
The proposed equation for calculating the hardening modulus is based upon the assumption that the stress limit proportionality Sp is equal to 72% of the yield strength, and linear hardening lasts up to the yield stress (Equation 4).
The distribution of the hoop stress due to internal pressure in the elastic and plastic areas and the corresponding pressure that produces these stresses were obtained based upon the differential equation of equilibrium for the annulus, boundary conditions, and elastic linear hardening stress-strain diagram.
Equations 5-7 determine the distribution of the hoop stress in the elastic and plastic areas of the pipe wall and the internal pressure that produces these stresses.
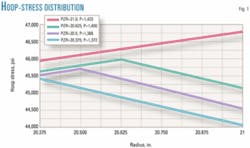
Fig. 1 shows the distribution of hoop stress in the entire wall area due to internal pressure vs. the plastic zone radius (PZR) in 42 in. x 0.625 in. pipe (Sp = 46.8 ksi, S = 65 ksi).
The lower line represents the solution for the case when the plastic zone radius is equal to an inside radius, i.e., an elastic linear solution that agrees with the Lame Solution. For the linear model of steel, the maximum hoop stress is on the inner surface of the pipe wall.
Because part of the pipe wall is in a plastic condition, the hoop stress reaches the maximum on the boundary between the elastic and the plastic areas.
The upper line represents the solution for the case when the plastic zone radius is equal to an outside radius; i.e., the entire pipe wall is in a plastic condition. The hoop stress reaches the maximum on the external surface. This latter solution is in qualitative agreement with the experiments that demonstrate that the bursting of pipe from internal pressure starts on the external surface of the pipe wall.
Based upon Equations 5-7, Equation 8 gives the maximum hoop stress, which occurs on the external surface of the pipe, vs. pressure and pipe size.
According to B31.8, the maximum allowable hoop stress is the maximum hoop stress permitted by the code for the design of a piping system. To comply with code requirements, the allowable design pressure vs. allowable hoop stress may be calculated as Equation 9.
This equation links the design pressure with the nominal wall thickness, the nominal diameter, and the allowable hoop stress, and enables one to determine the required nominal wall thickness for an established operating pressure.
Equation 9 takes into account the distribution of hoop and radial stresses across the pipe wall, the nonlinear property of pipe steel, and the main principals and methodology of the code. The hoop stress determination is based upon limit-state concepts, and design-pressure determination is based upon the traditional method that uses allowable hoop stress.
Assume that the hardening modulus is equal to zero, i.e., the nonlinear property of steel is described by an elastic, idealized plastic stress-strain "Prandtl Diagram." In this case, k = 0 and Equation 9 is in qualitative agreement with Equation 35a in paragraph K304.1.2 of ASME B31.3,9 which is used for calculating the wall thickness of straight pipe under high internal pressure.
Equation 9 is also in agreement with the second equation in paragraph AD-201 of ASME Section VIII, Division 2,10 which is used for calculating the wall thickness of cylindrical shells.
Table 2 shows the percentage increase in value obtained by calculating the design pressure from the equations proposed vs. B31.8 equations, using the same allowable stress for Grade X-65 steel.11
The proposed method of hoop stress determination therefore provides a more economical solution.
Wall thickness vs. temperature differential
For a restrained pipeline, determining wall thickness vs. temperature differential is important for modern pipelines. Increased wall thickness may be required or it could be necessary to cool the transported product. Also, pipelines being constructed in arctic regions may require increased wall thicknesses due to the combined effects of temperature rise and pressure.
Unlike B31.4, B31.8 includes neither criteria for longitudinal stress and equivalent (combined) stress nor an equation for determining the longitudinal stress for a restrained pipeline. In our opinion, these factors should be incorporated into B31.8.
It is proposed to include in B31.8 the criteria of longitudinal stress and the equivalent (combined) stress based upon Von Mise's theories for onshore restrained pipelines. This is similar to the criteria for offshore pipelines in B31.8 (Equations 10 and 11).
There is every reason to consider the nonlinear property stating that the allowable stress of 90% SMYS exceeds the proportionality limit of the steel. For example, for the linear model the strain corresponding to a stress of 90% SMYS for steel of Grade X-52 is about 0.17%, and the actual strain that produces this stress is about 0.26%. It can therefore be seen that the actual strain is more than 50% greater than that given by the linear model.
The axial longitudinal tensile stress is determined by the generalized Hook's law for restrained conditions and should be based upon the effective Young's modulus and the effective Poisson's ratio (Equation 12).
In this modified classical equation, the elastic modulus and Poisson's ratio are replaced by the effective Young's modulus and the effective Poisson's ratio, which consider the nonlinear property of the pipe material. This modification is based upon the theory of small elastic-plastic strains.
The effective Young's modulus is the secant modulus determined according to the uniaxial stress-strain diagram (Equation 13).
In accordance with the theory of small elastic-plastic strains, the effective Poisson's ratio is calculated as Equation 14.
The proposed method8 considers the nonlinear property of pipe steel and can be used for the following three tasks:
- If the actual nominal thickness is equal to or more than required due only to the design pressure, then the allowable temperature differential may be calculated based upon the code and above criteria for allowable stress.
- If the actual temperature differential is more than the allowable temperature differential, then the required wall thickness may be calculated based upon the code and above criteria.
- For known values of wall thickness and temperature differential, the actual longitudinal stress may be calculated by use of an iteration process.
Below are the results of calculations for a restrained 24-in. pipeline, Grade X-52, with a design pressure of 1,440 psig:
According to code (design factor F = 0.72), the required nominal wall thickness is 0.462 in. The allowable positive temperature differential according to the linear solution for longitudinal stress determination (the method as in B31.4) is 114° F., and according to the nonlinear solution (proposed method) it is 185° F. The allowed temperature is more than 70° F. higher.
For a positive temperature differential of 140° F., the required wall thickness according to the linear solution is 0.565 in. For the nonlinear solution (proposed method) the solution is 0.462 in. The reduction in required wall thickness is more than 18%.
If the positive temperature differential reaches 185° F., then the required wall thickness according to the linear solution becomes 0.96 in. instead of 0.462 in., as shown by the proposed method. Under the linear solution, the required wall thickness is more than doubled.
Thus, for a restrained pipeline, the suggested method essentially permits an increase in the allowable temperature differential (cooling temperature) or a reduction of the required wall thickness.
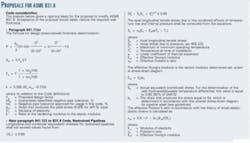
The box on the previous page shows the authors' proposals to be included in ASME B31.8 Code.
References
1. Powers, J.T., Dalton, P., and Aynbinder, A., "International Pipeline Design Code Comparisons and the Trend Towards Limit State Design," Energy Week '96, Pipelines, Terminal, and Storage Conference, Houston, Jan. 29-Feb. 2, 1996.
2. ASME B31.4, "Liquid Petroleum Gas, Anhydrous Ammonia, and Alcohols."
3. API Spec 5L, "Specification for Line Pipe."
4. BS8010, British Standard, "Code of Practice for Pipelines, Part 3, Pipeline Subsea: design, construction and installation."
5. NEN 3650, Dutch Standard, "Requirements for Steel Pipeline Transportation Systems."
6. Timoshenko, S., Strength of Materials, Third Edition, Part III, New York: Kriegas, Huntington, 1976.
7. Aynbinder, A., and Taksa, B., "Wall thickness/Design Pressure Formulation, GIE Study, SUPERB Project and ASME Comparison," Energy Week '97, Houston, Jan. 27-30, 1997.
8. Aynbinder, A., et al., "Pipeline design method can reduce wall thickness, cost," OGJ, Feb. 20, 1995, p. 70.
9. ASME B31.3, "Chemical Plant and Petroleum Refinery Piping."
10. ASME, Boiler and Pressure Vessel Code, Section VIII, Division 2, Part AD, "Design Requirements."
11. Aynbinder, A., and Taksa, B., "More precise pipe wall calculation developed," OGJ, Apr. 29, 1996, p. 57.
The authors
Alexander Aynbinder (http: //aynbinder.tripod.com) is a senior principal engineer at Gulf Interstate Engineering Co. Previously, he was in the pipe- line engineering department of Fluor Daniel Co. Before immigrating to the US, Aynbinder was a lead research scientist in the Russian State Research Institute for Pipeline Construction (VNIIST). He is a graduate of the Moscow Civil Engineering Institute and received a PhD in civil engineering from the Central Research Institute of Civil Structures (ICNIISK), Moscow. Aynbinder's major work has been in stress analysis of onshore and offshore pipelines and piping systems.
Boris Taksa is a vice-president of Gulf Interstate Engineering Co., responsible for business development in Eastern Europe and the former Soviet Union. He is a member of the ASME B31.8 Code committee. Taksa joined Gulf Interstate in 1979. Before immigrating to the US, Taksa worked at the State Research Gas Institute in Moscow. He is a graduate of the Moscow Institute for the Petrochemical and Gas Industry.


